My first job at 14 was as "Webmaster" for my Uncle's aerospace engineering firm. I had two major responsibilities at this job. The first was to ensure I picked up the correct lunch orders for the real employees at the company. The second, was to write and send out a weekly newsletter - which I did by writing raw HTML emails and sending them in batches of 20 to an email list of over 1000 recipients using bash, Outlook, and mail merge.
I remember spending months of my adolescence dealing with the quirks of <table> elements, the inconsistent styling of buttons and images between email clients, and cease and desist letters from email providers who believed me to be (rightfully so) one of the dumbest email spammers in the world.
Eventually, I convinced my Uncle to pay for a Mailchimp subscription. However, that experience taught me a valuable lesson:
Email is hard.
Why then - you might be wondering - did I spend the last two weeks building my own system for sending an email newsletter instead of using a modern service like Substack, ConvertKit or Beehiiv?
Well, I'm wondering that myself 😅. So, in this article I'm going to try to justify my own actions and explain the 3 reasons why (and the 3 ways how) I built my own email newsletter workflow in 2023.
Let's get started by talking about the main reason I chose to roll my own solution instead of using something off-the-shelf...
🎨 Creative Control
One of the major benefits products like ConvertKit or Substack provide is the ability to not have to write your own HTML email. They let you pick from a plethora of pre-designed templates that look good on any device and email client. On top of that, they give you WYSIWYG editors that enable you to personalize the content and styling of those templates.
However, the tradeoff for the convenience of not generating your own HTML is that you have to use these tools to do it. For most people, that's probably a good thing. But for me, I wanted my newsletter to always directly match the styling of my blog.
And to do that, I would have had to spend a lot of time in these (often buggy) tools making custom templates and remember to go back into that tool every time I make styling changes to my website that I want reflected in my newsletter.
That was a hassle I just didn't want to have. So, I decided to generate my own HTML using React Email and Tailwind.
React Email is a library that gives you a set of React components that help you build and render email friendly HTML. It's very similar to MJML - the library that has been the gold standard for this type of work for over a decade. The reason I chose to use React Email, though, was that it supports styling with Tailwind.
Since my website is styled with Tailwind, I can use my existing Tailwind configuration to easily style my emails to match my website. With this setup, it's easy for me to reuse components and assets and make changes all within my IDE - instead of being locked in to using a proprietary WYSIWYG editor.
Choosing to write my own HTML emails adds some upfront complexity to my newsletter system. However, I believe the long-term benefits outweigh that initial cost. Especially since having a system for generating raw HTML means I also have the option of using any email service that can send HTML.
And as we'll see in the next section, that could save me a lot of money.
🤑 Price
Email design editors are often the flashy feature of newsletter services, but that's not really what you're paying for. Behind the scenes, these companies provide an important and often invisible benefit to their customers: compliance.
Email infrastructure isn't publicly controlled or maintained (although it should be), but it is essentially a utility. As such, there are a lot of rules and regulations designed to limit the amount of spammers and marketers who abuse the last open communication platform on the internet. And companies like Mailchimp, ConvertKit and Substack spend a lot of time and money ensuring the emails you send through them comply with these standards.
These include implementing things like prominent and reliable "Unsubscribe" links so that recipients unsubscribe rather than mark your email as spam, subscription confirmation systems so that you only send emails to those that actually want to receive them, and CAPTCHAs on subscribe forms so that your recipient list doesn't get full of fake emails that will bounce or always go on unread.
When people question the price of products like ConvertKit, this is the behind-the-scenes work they don't see. The reason it costs nearly $1,000 a year to manage a newsletter with 8,000 subscribers is because ConvertKit is using that money to ensure that when you actually send an email to those subscribers, they will get that email.
But I decided to learn and implement these best practices myself to save a few bucks 😅.
Using SendGrid's Marketing Campaigns API, I setup my website to manage subscribing, unsubscribing, and email confirmation. My simple solutions are by no means comprehensive to those that ConvertKit and other newsletter services provide to help maintain sender reputation and high rates of deliverability, but they do a good enough job for me for now.
And now, my email list costs less than half of what it would if I managed it with a product like ConvertKit. Those costs will also scale at a better rate as my list grows than they would with a managed newsletter service.
Using SendGrid to manage my email list and send my emails also opened me up to the final reason I rolled my own newsletter instead of going with an off-the-shelf solution...
🛠️ Tool Integration
To manage all the content on my website, I use a content management system (CMS). This is a central place where I can host images, publish articles, and manage the copy on my home page. It's the hub that stores my online work.
Because of this, part of my ideal newsletter setup was being to also host all of that content inside my CMS. Rather than having to login to different services for publishing articles and sending emails, I wanted a single place to do both.
On top of that, my newsletter is essentially just a notification that I've published something new. I only send out an email when I have a new article or video that I want to promote. So, being able to automatically send out an email when I press publish on an article would be a huge win.
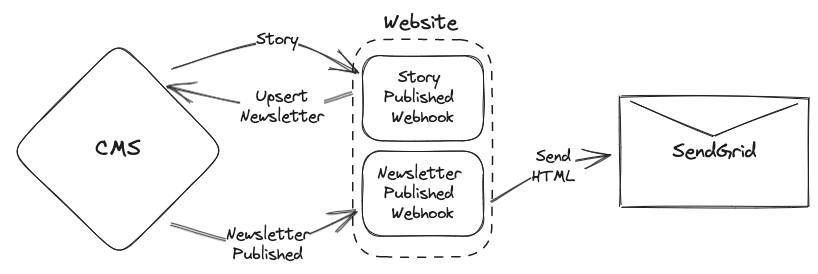
So, that's what I did. Using a system of webhooks between my website and my CMS, I setup a system where publishing a Story automatically upserts a Newsletter with some default copy and a link to that Story. From there, I can go into my CMS, tweak the copy on the email, hit publish, and another webhook will generate the HTML and send out an email to my subscribers using SendGrid.

I've only used this workflow a few times so far, but it's already faster and simpler than having to login to a separate service and write each email from scratch every time. Also, because the content is linked together, I can add additional features in the future like automatically pulling in excerpts or linking sources from my articles directly into the email.
🎉 Yay for owning your own content distribution!
☝️ Write twice. Publish once.
I'm really happy with this way of publishing my newsletter and I'm excited to get back into the practice. I've been really focused lately on writing longer pieces that take time to research and develop. And once I've written and rewritten a piece like that, the last thing I want to do is click through a bunch of forms on various platforms in order to actually publish it.
In the future, I plan to expand this system to also automatically publish an audio version of my articles to a self-hosted podcast feed. If that sounds interesting to you, be sure to subscribe to my newsletter down below and I'll send you an email the next time I hit publish 😉.
Until next time.

